How to Adjust Sewing Machine Tension

 Adjusting the sewing machine tension is an important sewing skill to learn. This is because whenever your sewing machine’s tension isn’t right, it’s going to lead to uneven sewing as well as result in problems like a loose stitch here and there.
Anything that you sew on a sewing machine that doesn’t have a proper tension would also likely cause the stitching to look different on both the sides. This is regardless of whether you’re using an overlocker sewing machine or any other type of machine.
In order to ensure even sewing and the stitching looking the same on both the sides, the tension has to be perfect, irrespective of the type of sewing machine you use, which includes an otherwise more efficient sewing machine for overlock stitching as well. This includes the tension on both the sides, as if either the one on the top or the bottom has any problem, you won’t be able to sew properly.
In other words, both the tension on the top and the bottom have to work together. However, before we get to explaining how to adjust sewing machine tension, it’s important to make sure the tension is actually what is causing the problems you’re experiencing with your sewing. This is because there are also some other similar issues that are easy to mistake for the tension not being right.
Table of Contents
Making sure the tension is the problem
First things first, if your machine is sewing properly and the stitches look exactly how they should be, don’t bother making any sewing tension adjustment. It’s important to note that we aren’t just talking about straight stitches here, but also other types of stitches like zigzag stitches. For zigzag stitches, we recommend using a sewing machine for zigzag stitches.
However, if you find the stitching to be more visible on one side than the other, or too loose on one side and tight on the other, you would want to first check for some of the below issues before deciding your sewing tension being an issue and trying to fix it.
Oiling
We aren’t talking about oiling your entire machine here, but sometimes dropping a bit of sewing machine oil on the hook area (it may or may not be applicable to you depending on your machine and other factors) can work wonders when dealing with minor stitching issues.
Threading issues
Incorrect threading is often a common reason for the stitching getting messed up. So some of the things you will have to check with respect to your machine’s threading include:
- Making sure all the thread guides have been used
- The pressure foot must be down when threading the machine, as if it’s not it tends to make the thread end up between the tension discs
- You also need to ensure that the thread is having no issues unwinding itself from the spool; if the spool’s splash is interfering with the unwinding process, then it may need your attention and the tension may not the culprit here
- The bobbin, too, needs to be exactly where it should be; if it isn’t, you may need to pull it out and insert it back in properly
- The bobbin also shouldn’t be used as a spool as it too is typically associated with threading issues
Pressure foot
While not the most common sewing machine issue, not using the correct pressure foot for a particular technique and fabric, too, can cause issues that are similar to what using the wrong sewing machine tension would.
Cleaning the machine
If you haven’t cleaned your sewing machine in a long time, things like lint and thread ends may have found their way into different parts of the machine such as the area under the throat plate, between the tension discs, or anywhere around the bobbin and bobbin case.
They can all interfere with the functioning of the thread, and make it difficult for the thread to flow freely. If this does seem to be the case, you would need to use a clean, lightweight and lint-free cloth and get rid of the lint and thread ends that may have gotten into the bobbin area and other parts.
How to Adjust Tension on a Sewing Machine?
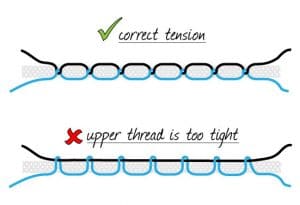
Having the right tension is basically all about ensuring that the tension on both the sides is perfectly balanced. This means that none of the sides should have the thread being too loose or too tight. Of course, when the thread is loose on one side, it will be tighter on the other and vice versa.
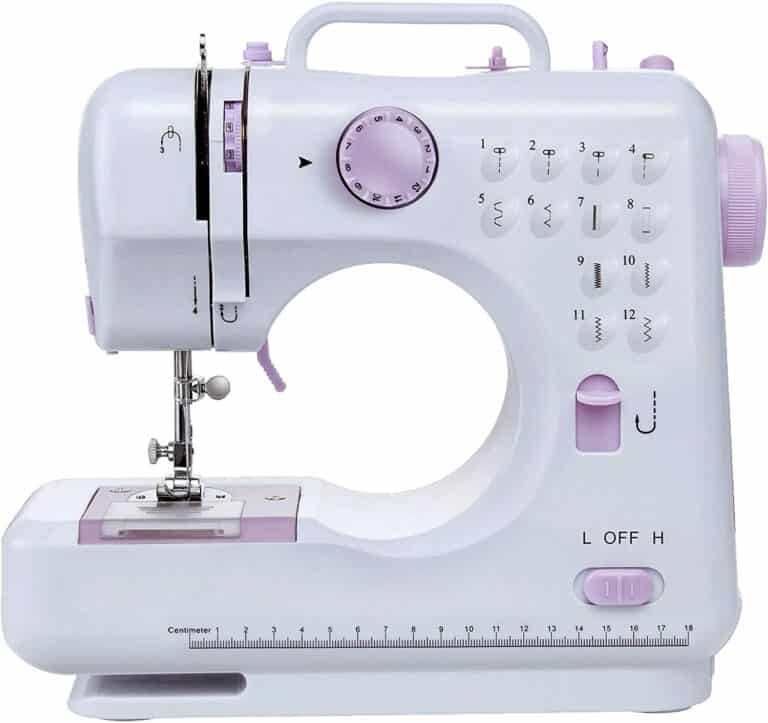
When the top thread is too tight, the bobbin thread will be easily visible on the top. To fix the tension in this case, you will need to move the tension dial towards zero on the sewing machine tension numbers scale.
Similarly, when the top thread is loose and the bottom thread is tight, you will be able to see the top thread through the bottom. This means that the tension is lower than it should be here, so you will need to move the tension dial in the opposite direction of what we did above, which is towards the higher numbers on the tension dial.
Here’s our relevant guide to thread weight.
How Much to Increase or Decrease the Tension?
Well, you just learned how to find out whether the tension is causing the stitching issues you may be facing, and how to fix the tension depending on which side of your fabric the thread is a bit too loose and on which side it’s too tight.
However, while you now know when to increase or decrease the tension, how do you figure out by how much should you be increasing or decreasing the tension? Well, for that, you will need to take a scrap piece of light-colored fabric that makes it easy for you to see if the top or the bottom thread is being visible on the other side.
Then, you need do a bit of stitching on it to find out whether your machine’s tension needs to be increased or decreased. Once you figure that out, you will then need to increase or decrease it very slowly.
So for instance, if the tension dial on your sewing machine is pointing to the number 7 on the dial, and you need to decrease it, you will only want to do it by ½ or 1. Then, you should go back and do some stitching again on the scrap fabric.
If you still find the thread to be visible on the other side, meaning it’s too loose on one and too tight on the other side, you will need to continue doing the exact same thing as explained above until you stop seeing the thread being visible on the other side. At that point, the threading should be perfectly balanced and the thread must not be loose or tight on either side.
This is pretty much all about it. This process may take some getting-used-to, but once you do, you may be able to fix your tension in a few minutes when it doesn’t seem right.
Want to learn more about sewing machines? Check out our Best Sewing Machine Reviews.