Sewing Faux Leather – Why and How to Do It?

In addition to that, it also boasts many advantages over the latter, which means that it would serve you much better overall than its real counterpart. While the significantly lower price is one of them, it would also make your life easier as a sewer as it’s way easier to sew on than real leather.
The maintenance, too, is a breeze with faux leather, while it can be a nightmare with real leather, what with the hefty dry-cleaning bills. In most cases with faux leather, all you would need to do is just wipe the thing with a damp cloth to keep it looking as good and attractive as new.
What’s more, faux leather now also comes in a variety of types, patterns and textures – with some looking and feeling amazingly similar to those exotic real leather that cost a bomb.
Table of Contents
The challenges involved
While sewing on faux leather is far from as challenging as sewing on real leather, there still are a couple issues that can make things harder than sewing on a “normal” fabric. The first is that faux leather can be a bit sticky when you’re sewing on it, so you need to know how to work with that.
Secondly, any hole you make into faux leather will be permanent, and that’s definitely something important to keep in mind as well. Finally, faux leather is one of the more demanding fabrics to sew on and would give your needles a hard time. In other words, you would find them wearing out considerably faster when working on faux leather than most other fabrics.
That all said, you just need to follow a few simple techniques and not let any of these difficulties get in the way of getting what all faux leather has to offer. While it may take a bit of getting-used-to, the end result may very well be worth it given the huge variety of cool things you can make using faux leather.
So now let’s talk about how to sew on faux leather the right way.
A different approach to measuring and cutting
You can’t go about cutting faux leather the same way as you cut other fabrics, simply because the pins would leave a permanent hole. So you would only want to use the pins in places that won’t be visible on the end product.
As for measuring and cutting faux leather according to a particular pattern, you will need to get pattern weights, a cutting mat, a sharp cutter and a ruler. You need to place the fabric with its right side up on the cutting mat, and use the pattern weights to hold it in place.
You need to then put the pattern piece on the fabric, and use the cutter and ruler to cut accordingly. You actually wouldn’t need the ruler until when you’re trying to get a straight edge.
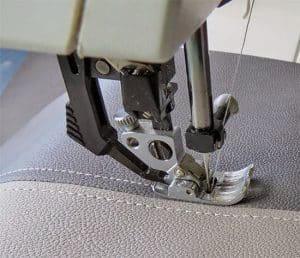
Replacing your sewing machine foot
As mentioned earlier, faux leather tends to sticky as a fabric when being stitched, which is especially true when sewing from the right side of the fabric. However, you can easily get around this issue by replacing your machine’s pressure foot.
The fabric would stick to the regular metal one most machine come with, but not with something made from a non-sticky material. A tractor style foot would work just as well, too.
You would find this incredibly helpful when it comes to topstitching straps as well as other things that tend to be right-side-out on all the sides. A non-sticky pressure foot will help pave the way for a surprisingly smooth sewing experience, while you may have trouble maintaining the accuracy big time when using a regular metal pressure foot.
Some sewing machines also come with a sophisticated built-in fabric feeding system, which can come in handy when working on sticky fabrics. A good example is Janome’s AcuFeed™ Flex system.
An alternative technique
However, if you have neither of the above things, you would have to seek an alternative in using a strap of wax to get the job done. All you need to do is put the strap under your machine’s regular pressure foot.
It will not only prevent the faux leather from turning sticky and causing accuracy issues, but would also allow you to see through it so that you can always stay on top of the sewing process. This technique is pretty simple to implement and would cause no harm to your work after you’re done, as the strap of wax can be taken off easily without any problem.
General sewing tips for faux leather
Now that you’re aware of most of the important stuff you need to know about when sewing on faux leather, let’s walk you through a couple general sewing tips for getting the best results when using faux leather for your sewing projects.
The needle
You would be way better off with a sharp needle than your regular one. It doesn’t cost much but would minimize the hole size, and as the holes are permanent, the end result would look much better.
Similarly, you would ideally want to use a new needle for this particular sewing project even if you already have a sharp needle that you used on other projects. You should also be having a few of them in spare as faux leather will likely eat them up pretty quickly, especially if you’re working on a big project.
The type and length of stitches
If you’re after a modern, cool-ish look, you may want to go for zigzag stitches. You may need a dedicated sewing machine for zigzag stitching, though.. if you want it to be perfect or if you’re going to be doing that stitch a lot.
However, if you would like to keep it simple, simply stick to the usual straight stitching.
Either way, make sure the length of the stitches is a bit on the larger side as the ones that are too small can damage the material as well as weaken the seam over time.
Head back to CHAPTER 4: Sewing 101 for Aspiring Home Sewists!