How to Sew a Bound Buttonhole

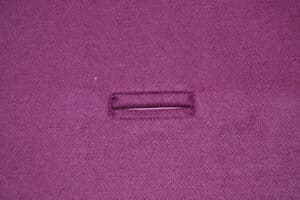
Table of Contents
Making the Markings
Start by making the markings where you want the button hole to be placed. You can use chalk, pencil, or a running stitch on the interfacing to mark the:
- Middle of the garment
- The placements for the buttonholes
- Buttonhole ends
Beginning the Buttholes
Make the interior of the button hole with a piece of sewing fabric; it should measure about 2 inches wider and 1 inch longer than the buttonhole. Center the piece over the buttonhole and use a hand sewing needle to baste around the edges of the patch.
Cut the Bound Buttonholes
Cut a slit in the center of the fabric where you have marked out the buttonholes. Pull out any basting stitches that were being used to secure the piece of fabric in place and then turn the piece of fabric into the inside of the buttonhole.
Bound Buttonhole Edges
Use the initial line for the buttonhole as a guide and fold the long ends of the piece of fabric so that they meet in the middle of the hole that you created. Make sure to keep both ends equal and hand baste the edges of the buttonholes.
Sewing and Lining the Buttonhole
Position the material so that it is right side up and fold it back so that you can see the slit and stitches. Sew directly into the stitches on all sides of the buttonhole. Next, sew a rectangle in the lining that’s the same size of the rectangle that you marked in the fabric. Slit this rectangle, the same was as you slit the buttonhole in the fabric. Once slit, fold back the fabric to expose all of the stitches. Lastly, you’re going to want to hand stitch the lining around the buttonhole so that it is secured in place.
Tips to Remember
- Keep in mind that a bound buttonhole is rectangular in shape and shouldn’t be any wider than ¼ inch
- Work on one buttonhole at a time. Make sure to complete the buttonhole you are working on before you move onto the next one.
- When you’re sewing with your machine, avoid back stitching, as it doing so can throw off the shape of the rectangle.