Unlock Secret Hacks: Remove Embroidery on a Budget Now!

As a beginner in the embroidery business, I quickly learned the importance of investing in helpful tools like the Peggy stitch eraser to make jobs easier. In this article, I will show you how to remove stitches without one of these tools by using a simple razor and some stabilizer.
I will guide you through the process of correcting a mistake on a shirt by shaving off the stitches with a simple razor. With my tips on using stabilizer and avoiding damaging the fabric, you can easily fix any embroidery boo-boos.
Table of Contents
Key Takeaways
- Investing in helpful tools like the Peggy stitch eraser can make embroidery jobs much easier.
- Removing stitches with a razor is a simple and effective method, but be sure to use 2 layers of stabilizer and avoid damaging the fabric.
- With these tips, you can easily correct embroidery mistakes and achieve professional-looking results.
Remove Embroidery: The Horrifying Boo-Boo
Removing Stitches with a Razor
When I made a mistake and embroidered the wrong color on my shirt, I had to find a way to fix it without spending money on a fancy stitch eraser tool. That’s when I remembered a trick I used when I was new to embroidery – using a simple razor to remove stitches.
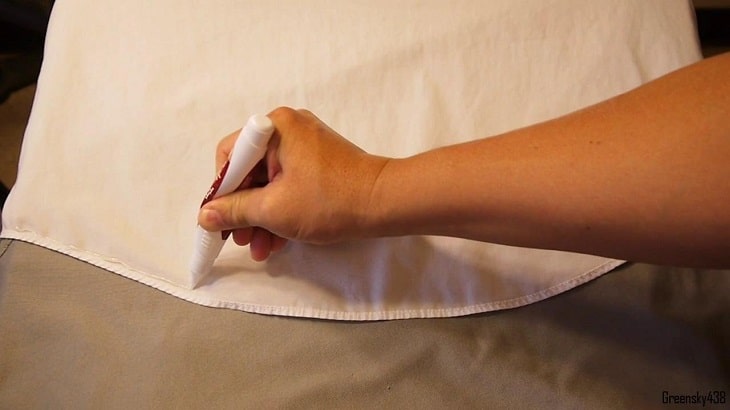
To do this, I used a double-bladed razor, like the Gillette brand my mother swears by. After turning the shirt over, I held it tight and rubbed the razor back and forth over the stitches on the stabilizer.
It’s important to be careful and use a flat surface, as you don’t want to accidentally shave into the fabric.
Importance of Stabilizer If You Want To Remove Embroidery
To make sure the fabric doesn’t get damaged, it’s important to use a stabilizer. I always use a cutaway stabilizer for items that will be washed, as it holds up better over time. The stabilizer acts as a barrier between the fabric and the razor, making it easier to remove the stitches without damaging the fabric.
Removing Underlay Stitches
After removing the main stitches, there may still be some underlay stitches left. In my case, the lettering was only half an inch tall, so the only underlay stitch I had was a central walk stitch. To remove this, I used a tool like a tweezers or my fingernail to pick them out.
It’s important to be gentle and not make any holes in the fabric. If you do, you can spritz it with a little water to relax the fabric when it dries, and everything should go back to normal.
By following these simple steps, you can easily fix a stitching mistake without spending money on expensive tools. Just remember to be careful and use stabilizer to protect the fabric.
Why I Recommend The Razor Method To Remove Embroidery
- Precision Power: With a razor, I can slice through those stubborn threads with meticulous care! It’s like being a surgeon for your embroidery – every cut is precise and controlled.
- Superior Speed: My embroidery mistakes don’t stand a chance! With swift movements, I can eliminate unwanted stitches faster than any other method I’ve tried, saving me precious time.
- Damage Control: Razor removal means no more tugging at my fabric. Now, I keep the integrity of my material intact! With careful glides, the razor only ever touches what it needs to – goodbye accidental tears!
- Economic Efficiency: Why would I invest in specialized tools when an ordinary razor does the job just as well? It’s cost-effective and readily available – a win-win situation!
- Masterful Technique: The control that comes with using a razor has improved my dexterity significantly! It’s not just about removing embroidery anymore; it’s about mastering the art of precision.
FAQ
Sure, here are 5 questions and answers about removing embroidery:
- Q: How do I remove embroidery from fabric?
A: How do I remove embroidery from fabric? To remove embroidery, first use a seam ripper or small scissors to cut the threads on the backside of the fabric. Then, gently pull the embroidery threads out from the front of the fabric. - Q: Can I use a seam ripper to remove embroidery?
A: Can I use a seam ripper to remove embroidery? Yes, a seam ripper is a great tool for removing embroidery. Use the sharp point to cut the threads on the backside of the fabric, then gently pull the embroidery threads out from the front. - Q: Will removing embroidery damage my fabric?
A: Will removing embroidery damage my fabric? It depends on the fabric and how the embroidery was applied. In most cases, removing embroidery will not damage the fabric. However, if the embroidery was applied with heavy stitching or a lot of tension, it may leave small holes or marks on the fabric. - Q: How can I remove embroidery from delicate fabrics?
A: How can I remove embroidery from delicate fabrics? Delicate fabrics like silk or chiffon require extra care when removing embroidery. Use small, sharp scissors to carefully cut the threads on the backside of the fabric, then gently pull the embroidery threads out from the front. - Q: Is there a special tool for removing embroidery?
A: Is there a special tool for removing embroidery? While a seam ripper or small scissors are the most common tools for removing embroidery, there are also specialized tools available. Embroidery scissors with curved blades can make it easier to cut threads close to the fabric, while tweezers can help you grip and pull out stubborn threads.