How to Remove Embroidery: Discover Fun & Fast Techniques Today!

Hi, this is Joleen and today I’m going to tell you how to remove embroidery from clothing, shirts, caps – just about anything. I’ve got lots of techniques, so let’s get started.
If you’ve ever tried to remove machine embroidery, you know how challenging it can be. Whether you’re trying to fix a mistake or repurpose an old piece, removing embroidery requires patience and precision.

Fortunately, there are several methods you can use to remove embroidery without damaging the fabric underneath.
Now you may ask, why do I know how to remove embroidery? I love to give embroidered pillowcases as wedding shower gifts, but you have to get the initials right!
So this is why I want to help you avoid the embarrassment of making embroidery mistakes. But I digress…let’s get on with how to fix this disaster.
One of the easiest ways to remove embroidery is to use an embroidery eraser or stitch eraser. These tools resemble a pair of trimmers and are ideal for removing professional-quality embroidery, such as logos on jackets, shirts, and caps.


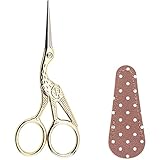
Alternatively, you can use a pair of fine-tipped embroidery scissors to snip away knots and cut the back of a bunch of stitches to make it faster to remove them.


For more tips on how to remove the stitches, keep reading.
Table of Contents
Tools for Removing Embroidery
When it comes to removing embroidery, you need the right tools to get the job done. Here are some of the most common tools you can use:
Using a Seam Ripper
A seam ripper is a small, pointed tool with a sharp blade that can easily cut through thread. To use a seam ripper, simply insert the pointed tip under the stitch you want to remove and gently push the seam ripper forward.
This will cut the thread and allow you to remove the embroidery.
Use a Razor
A razor is another tool that can be used to remove embroidery. To use a razor, simply slide the blade under the stitches you want to remove and gently cut through the thread.
Be careful not to cut through the fabric or damage the surrounding embroidery. I slipped with my hand and had a Slasher-size gash in my fabric. If you use this technique, get a holder for the blade.
I adapted my sourdough lame ( the blade that slashes your dough ) and found it really helped control the blade. I love it when you can use one tool for two different projects!

Using Tweezers
Tweezers can be used to pick out individual stitches or small sections of embroidery. Simply grip the stitch with the tweezers and gently pull it out. Be careful not to damage the surrounding embroidery or fabric.
Honestly, this technique is my least favorite. Might as well poke my eye out with a stick than spend time using tweezers, but I felt I needed to give you an option here, if nothing else.
#1 How to Remove Embroidery Using a Stitch Eraser
A stitch eraser is a specialized tool that can be used to make embroidery disappear without damaging the fabric or surrounding embroidery.
To use a stitch eraser, simply run the tool over the stitches you want to remove. The tool will cut the thread without damaging the fabric.
This is best done when a stabilizer has been used.
No matter which tool you choose, it’s important to work carefully and slowly to avoid damaging the fabric or surrounding embroidery. Be sure to test the tool on a small section of the embroidery before you begin to ensure that it won’t cause any damage.
Removing Embroidery from Fabric
If you want to eliminate embroidery from fabric, there are different methods you can use depending on the type of fabric and the embroidery. Here are some tips that explain how to remove embroidery from different types of fabric.
Removing Embroidery from Garments
To remove embroidery from garments, you can use an embroidery eraser or a stitch eraser. You can purchase this product online or in a well-stocked fabric store.
It is ideal for professional-quality embroidery, such as logos on jackets, shirts, and caps. If you don’t have an embroidery eraser, you can also use a pair of sharp scissors or a manual razor.
First, remove as much of the stitching as possible by snipping away any leftover stitches. Then, use a lint roller or a lint brush to remove any stuck threads or lint. If there are any holes or marks left behind, you can use an iron or a patch to cover them up.
Removing Embroidery from Towels
To remove embroidery from towels, you can use a pair of fabric scissors or a razor blade. First, snip away any loosened threads with a pair of embroidery scissors or a snip.
Then, use a razor blade to carefully cut the embroidery away from the back of the fabric. Be careful not to cut through the towel itself. If there are any leftover stitches or marks, you can use a lint roller or a piece of tape to remove them.
Removing Embroidery from Delicate Fabrics
To remove embroidery from delicate fabrics such as silk, linen, or wool, you need to be extra careful. You can use a pair of sharp scissors or an embroidery eraser.
First, snip away any leftover stitches with a pair of sharp scissors. Then, use an embroidery eraser to remove any leftover embroidery. Be careful not to damage the delicate fabric.
If there are any marks left behind, you can use a piece of tape or iron to remove them.
Remember, embroidery removal can be tricky, so take your time and be patient. If you’re a beginner, start with a small project and work your way up.
With the right tools and techniques, you can easily delete or remove any embroidery design from your clothing, towels, or any other fabric.
Tips for Removing Embroidery
If you need to remove embroidery from a garment or fabric, there are a few tips that can make the process easier and less frustrating. Here are some techniques to try:
Using a Magnifying Glass
Sometimes, it can be difficult to see the tiny stitches of machine or hand embroidery, especially if they are densely packed. A magnifying glass can help you get a better view of the stitches, so you can work more accurately and avoid damaging the fabric.
If you have a magnifying glass that hangs around your neck, you should be golden using this technique.
Look for a magnifying glass with a strong lens that will allow you to see the details clearly.
Using a Rubber Tip
When you’re removing embroidery, it’s important to be gentle and avoid damaging the fabric. One way to do this is to use a rubber tip to help loosen the stitches.
You can find rubber tips at most craft stores or online. Simply place the tip on the stitches and gently rub back and forth until the thread starts to loosen. Be careful not to rub too hard, as this can damage the fabric.
Remember to take your time when removing embroidery, and be patient. It can be a time-consuming process, but with the right tools and techniques, you can get the job done without damaging the fabric.
Benefits of Removing Embroidery- Look at the Bright Side!
- Discover a New Skill! Unearth the secret techniques of extracting stitches cleanly. Soon, you’ll be able to remove any embroidery from textiles without causing damage!
- Be Your Own Fixer! Learn how to take control over your designs – mistakes no longer mean starting right from scratch. Gain confidence as you develop the ability to fix any embroidery mishap.
- Unlock Creativity! Transform your pre-loved items into blank canvases again, ready for fresh, new designs of your choice. Say goodbye to constraints and let your imagination fly.
- Master the Art of Precision! Hone your fine motor skills with detailed stitch removal techniques. Not only will you learn a practical skill, but it’s also a great method for improving focus and patience.
- Embrace Sustainability! Breathe new life into old clothes by removing outdated or worn-out embroidery. It’s not just about developing a hobby; it’s about making conscious choices for our planet too.
If you’re new to embroidery, it’s always a good idea to practice on a piece of scrap fabric before working on a project. This will help you get a feel for the process and build your confidence.
Additionally, if you’re working with hand-stitched embroidery, be sure to take your time and use a gentle touch. Take it from me, rushing can lead to mistakes and damage to the fabric.
Overall, removing embroidery is a simple process that anyone can do with a little patience and the right tools. Whether you’re a seasoned pro or just starting out, it’s important to take your time and be gentle with the fabric.