Things You Need to Get Before Starting an Embroidery Project

 Let’s face it. Even some of the sewers that are otherwise experienced at sewing find it challenging to work on an embroidery project.
But let me tell you that it’s actually all in the tools. Once you have all the right tools at your disposal, then sky is the limit of what you can achieve with respect to the kind of things you can make or the decorative feel and look you can give to a product.
So without any further ado, let’s jump in.
Table of Contents
Basic Embroidery Tools
There are some basic tools that you would need to get, no matter the type of embroidery project you may be working on. Let’s walk you through them below.
Embroidery Floss
It’s basically 6 strands of embroidery threads loosely put together. Depending on how thick you want the stitches to be, you need to choose the number of strands to use.
Embroidery floss comes in quite a few colors, and in just as many shades. However, for anything that needs to be too decorative, the rayon embroidery floss will work the best.
Needles (For Hand Embroidery)
The hand embroidery needles are of different lengths, but they all have a large eye as embroidery threads tend to be much thicker than the ordinary sewing ones.
Scissors
Scissors are a must for pretty much every sewing project, but you would need something different when working on an embroidery project, depending on the nature of your project.
For cutting fabric when working on general embroidery projects, especially the ones where you would be using your sewing machine, you would ideally want to use a large scissor. However, for hand embroidery projects, the recommended choice would be a small one with sharp points. A thread snip would work just as well, though, if not better.
Some embroidery projects also involve cutting the fabric edges in a zig zag manner, and if that’s the case with your project, then a pinking shear will be your best bet.
Here’s where you can learn all about zigzag stitching and sewing machines for zigzag stitching.
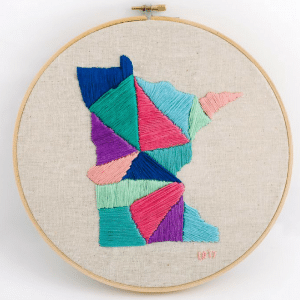
Embroidery Hoop
It’s an embroidery tool made of two rings, one smaller than the other that fits into the larger one. The standard size that will work well for most embroidery projects is 12”, although there are smaller and larger ones available as well.
Something to keep in mind here is that when you put the fabric into the hoop, you need to have at least 2” of the fabric outside the hoop.
Thimble
This is a small but useful tool that allows you to put the needle into the fabric without hurting your middle finger. You can find both metal and plastic thimbles on the market.
Marking Tools
These are pretty self-explanatory and often needed for most sewing projects. See our guide to marking tools.
Choosing the Fabric for an Embroidery Project
Now that we are done discussing what tools you need, let’s get to a crucial element of your embroidery project: the fabric. The reason there’s a need to know more about embroidery fabrics is that they tend to be different than the usual sewing ones.
Embroidery fabrics come in three types – man-made, natural, and a combination of the two. You need to be a little specific here as the different ones come with different features; there are some that don’t fray at all, some that turn out to be a great option when you want the fabric to pleat well, and then there are also some that are just known for a loose weave which makes them more suitable to be used for certain types of embroidery projects.
The right fabric for your embroidery project may boil down to the type of stitches you will be creating, as well as what exactly it is that you’re making. For example, a bag or a purse with a ribbon demands something much different than a baby dress that you’re looking to make a floral design on.
That said, a 100% cotton fabric usually doesn’t disappoint for most embroidery projects, though linen works better when you’re after a gorgeous look and feel for the final product.
Regardless of which fabric you go with, make sure it’s a high-quality one. You don’t want to put in tens of hours of work on a weak fabric that may end up getting damaged after a few months of use.
Now, you may want to note that some types of fabrics are believed to work better when using certain embroidery techniques. For instance, anything that involves canvas work with cross stitches may call for a specific type of fabric, but that’s not saying that you shouldn’t be using anything else.
In fact, if you’re willing to fail and learn, you can experiment with different types of fabrics and stitches. They may not always get you pretty results, but once in a while you will end up making something that you will be proud of.
Finally, an important tip here would be to have an extra 2” of the fabric around your design; it may help you prevent a lot of headache in the later part of your project.
What About the Thread?
Just like the other things, you need to put some thought into what type of thread you will need for your project. They come in many different types, including the ones that are bright, dull, and even transparent.
But again, an important factor to consider here would the type of stitches you’re looking to create. Some of the standard options are cotton and any synthetic fabric that has cotton wrapped over it.
For best results, however, you would want to go with an embroidery floss from the same manufacturer as your thread. This will go a long way in achieving consistency with the color and the thickness, which can make a lot of difference to the overall look and feel of the end product.
As for the number of strands to use, 2 to 3 usually works pretty well for most projects. However, if you’re stitching on a very fine fabric, you may want to stick to just a single strand.
The Needle Needs Some Attention Too!
It would be a mistake to use any general needle for a particular embroidery project, as the needs are always very specific. A fabric with a loose weave would need a tapestry needle, while a crewel one would be ideal for anything that has to do with hand embroidery work.
When working on delicate clothes, opt for a small needle as the large one can leave holes that are larger than what you would want.
A Final Word
Embroidery work isn’t easy, but once you get the hang of it, you will create some masterpieces of sewing or embroidery work that you will cherish for a long time. Getting the right tools based on what I shared above, and letting your creativity kick in is the way to go when working on an embroidery project.
Head back to Chapter 1: The 7 Sewing Essentials for Beginners!