How to Taper Pants
| Step Number | Description |
|---|---|
| Step 1 | Turn the pants inside out and put them on. This makes the original seams visible and hides the markings. |
| Step 2 | Determine where to taper the pants by pinching in the inner and outer seams. The taper can start anywhere from above the knee to the ankle. |
| Step 3 | Use a chalk, pencil, or a piece of soap to mark where you want the new seam. Use a ruler to ensure your lines are straight. |
| Step 4 | Remove the original seam from the points where you want to taper the pants. Remove any broken threads. |
| Step 5 | Flatten the pants and line up the raw edges. Draw another line ½ an inch from the first line. This will serve as the new raw edges. |
| Step 6 | Cut the pants along the second line to remove excess fabric. |
| Step 7 | Place pins along the first line you drew on the pants. This will hold the material together as you sew the new seam. |
| Step 8 | Sew a new seam using a durable thread like denim or wool. Start from the bottom of the leg and work your way up, securing the seam with a backstitch at the end. |

Step 1
Start by turning the pants inside out. If you’re tapering your own pants, put them on; if you’re tapering them for someone else, have that person put the pants on. When the trousers are turned inside out, the original seams will be visible, which makes it easier to take the stitches out, cut the fabric, and create a new seam; plus, it hides the markings that you’re going to need to make on the pants.
Step 2
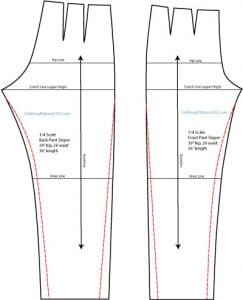
Determine where you want to taper the pants by pinching in the inner and outer seams. The taper can start anywhere you’d like; just above the knee, right at the knee, on the shins, or closer to the ankle.
Step 3
Use a piece of chalk, a pencil, or a piece of soap to mark the location where you would like to place the new seam. Use a ruler to make sure that your lines are straight before you start cutting and sewing.
Step 4
Remove the original seam from the points where you would like to taper the pants. Don’t forget to pull out the broken thread!
Step 5
Flatten the pants and line up the raw edges. Draw another line ½ an inch from the first line you made in the pants. This line will serve as the new raw edges of the pants.
Step 6
Cut the pants along the second line. Doing so will remove the excess fabric that you want to remove from the garment.
Step 7
Place pins along the first line you drew on the pants. This will serve as the new seam for your pants. Pinning the material will hold it together as you create the new seam.
Step 8
Time to sew a new seam! Whether you’re sewing with a machine or by hand, you’re going to want to use a durable thread, like denim or wool. Sew a straight stitch along the initial line you drew on the pants, starting from the bottom of the leg and working your way up. Add in a backstitch when you’ve reached the end of your line to secure the seam.
That’s it! Using these simple steps, you can taper any pair of pants in your wardrobe!
How to Taper Pants


