How to Sew a Slip Stitch

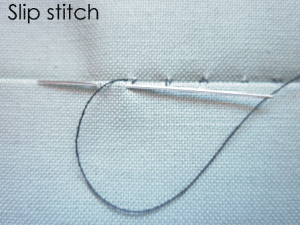
Table of Contents
What is a Slip Stitch?
Simply put, the slip stitch is a kind of loose stitch that joins two layers without being visible on the outer part of the fabric. It’s the smallest of the crochet stitches and turns out to be very useful when it comes to moving yarn across stitches but without making the stitching run longer.
It’s more of a handsewing technique than a type of stitch, and it’s also used for a few other applications than what we mentioned above.
The slip stitch, which produces a secure hold and is entirely undetectable from both the inside and outside of a garment, is in my opinion the most magical of all hand stitches.
The slip stitch is a fantastic option for any situation where an invisible thread is required. For instance, finishing bias bindings, joining seams you might not want to put through a sewing machine, like sealing pillows or plush or enclosing seams as on waistbands and collars.
Before we begin, a few things to consider:
What Kind of Needle Should I Use for Slip Stitching?
We advise using a single working thread and a needle with a smaller eye.
Use the measures that are most appropriate for your project because different projects and fabrics call for different measurements.
What Is The Key Element for Creating an Invisible Stitch?
The most crucial element for obtaining maximum invisibility is the placement of your needle’s entry and exit points.
What Do You Call The Folded Border?
The folded border that is attached to another piece is referred to as the hem.
Let’s begin the slip stitch now, okay?
All for today, thank you! I sincerely hope that you give the slip stitch a try so that you, too, maybe in awe of the pride and amazement that come with making such an enchanted, invisible stitch. Watch for future hand stitch guides, and feel free to browse the other articles in this series that highlight the catch stitch and whip stitch.
Cheers to hand stitching!
How Do I Sew A Slip Stitch?
Now that you’re aware of what a slip stitch exactly refers to, let’s get to learning how to do a slip stitch. However, as slip-stitch sewing can be a bit overwhelming initially, let us break it down into a few steps to make it easier for you to understand it and be able to follow it properly.
Step 1
To do a hand slip stitch, the first step would be to get a sewing thread that’s of a color that goes well with the color of the fabric. If the colors don’t match, the end product won’t look as good as you would like it to.
Similarly, you will also need to get a needle that’s of the right size depending on the fabric and its fiber content. The weight of the fabric will be an important factor to consider here.
Then, you will need to thread the needle. When you’re done, make sure you tie a knot at the end of the thread. This will hold the end part of the thread in place.
Now, put the needle through the upper part of the hem’s fold between the two layers of the fabric. As for how much you should be folding the hem, you will need to refer to the designer’s instructions for that.
Step 2
When the needle is pulled through the upper part of the fold of the hem, the end part of the thread with the knot will prevent it from getting through as well. At this point, all you should be doing is making sure the thread is as tight as it could be without breaking off.
If you have done this right, the thread will only be visible at the top of the fold.
Step 3
The next step is something you will have to be a bit more careful with, as you will need to repeat this step over and over again during the slip-stitching process. It involves inserting the needle into the main fabric, the part right beside the point where the knotted end is, while also making sure it’s perfectly leveled with the fold of the hem.
It must be on the left side of where the knotted end of the thread lies. However, you only need to catch a very small part of the main fabric when doing this.
This is important because it will form a dot that will be clearly visible on the part of the main fabric that’s right beside the fold of the hem.
Step 4
This step is actually a part of the 3rd step, but we listed it separately just in an effort to simplify things as much as we can for you here.
That said, in this step, all you need to do is pull the thread through that you just inserted beside the fold of the hem. Then make sure the thread is tight enough, but not so tight that it will cause the fabric to gather up.
Step 5
This step would actually be the last step, as after it the rest is just about repeating the steps we explained above. However, it’s an important step because you have to be very careful with the length of your stitch here. Let us explain.
In this step you will be putting the needle (with the thread) through the upper end of the fold that’s just on the left of the dot we made in the above two steps. But instead of simply making a dot there like the one we just did, you need to pull the thread a bit more so as to cover a fair bit of the fold of the hem.
Then pull out the needle to the right side of the fold. Now go back and see where the dot we created in the above two steps lies. If it’s there right in the center of where the thread starts on the fold and where it comes out, you have got it spot on.
Finally, pull through the thread enough so that it’s firm across all the stitches we made so far. However, again, be careful not to overdo it as it might cause all the stitches to come together.
Step 6
As said above, the difficult part of the process ends with the step 5. From this point it’s mostly just repetition of the steps above. Even so, there are a few things to note here.
When making the second dot – the type of dot we made in the steps 3 and 4 – you should again only be catching a very small part of the fabric. Only catching a few threads would suffice. This goes for all the dots you will be making on the main fabric during the slip stitching process.
Similarly, you need to make sure the second dot is exactly in line with the first one, in a way that it makes them be perfectly parallel to the fold of the hem.
Then you will be moving on to making the longer stitch across the upper part of the fold of the hem. However, again, be careful with the length here, as you will want it to be exactly the same as the length of the first stitch you made across the part of the fold.
This is crucial as it would help ensure that all the stitches are at the same distance from one another, which would, in turn, ensure an even distance between the dots as well.
All for today, thank you! I sincerely hope that you give the slip stitch a try so that you, too, may be in awe of the pride and amazement that come with making such an enchanted, invisible stitch. Watch for future hand stitch guides, and feel free to browse the other articles in this series that highlight the catch stitch and whip stitch.
Cheers to hand stitching!
Want to learn more about sewing? Head to Chapter 4: Sewing 101 for Aspiring Home Sewists