
SINGER HEAVY DUTY SEWING MACHINE TUTORIAL

Today I’ll be showing you how to thread and function the Singer Heavy-Duty sewing machine with my Singer Heavy Duty Tutorial. Whether you’re a beginner or just need a refresher, this video will cover the basics and help you get started.
We’ll go over everything from winding up the bobbin to threading the machine and using the basic functions. So grab your machine and let’s get started!
| Key Features | Troubleshooting | Fabric & Needle Selection | Maintenance & Cleaning | Tips & Tricks |
|---|---|---|---|---|
| – Designed for heavy-duty sewing tasks | – Check needle and thread tension | – Best suited for heavy fabrics like denim, canvas, and leather | – Regularly change the needle and clean the machine after each use | – Practice on scrap fabric |
| – Powerful motor and high sewing speed | – Check for tangled thread or debris in the bobbin area | – Choose the correct needle and thread based on fabric weight and type | – Oil the machine regularly | – Use correct stitch length and tension |
| – Can handle thicker fabrics with ease | – Adjust stitch length or needle position if needed | – Match thread strength to fabric weight and color | – Wipe down the machine to remove dust or debris | – Be patient and experiment with different stitches |
| – Built-in stitches and needle positions | – Take the machine to a professional for servicing if needed | – Use lighter needle for lighter fabrics, heavier needle for thicker fabrics | – Follow manufacturer’s instructions for maintenance | – Create professional-quality garments and accessories |
| – Automatic needle threader and drop-in bobbin system |
Table of Contents
- 1 Basic Functions
- 1.1 On and Off Button
- 1.2 Needle Control
- 1.3 Bobbin Placement
- 1.4 Thread Placement
- 1.5 Tension Button
- 1.6 Needle Position
- 1.7 Stitch Options
- 1.8 Reverse Button
- 1.9 What are the key features of Singer Heavy Duty sewing machines, and how do they differ from other Singer models?
- 1.10 How do you troubleshoot common issues with Singer Heavy Duty sewing machines, such as thread tension problems or jammed needles?
- 1.11 What types of fabrics and projects are best suited for Singer Heavy Duty sewing machines, and how do you choose the right needle and thread for each project?
- 1.12 How do you maintain and clean Singer Heavy Duty sewing machines to ensure they continue to perform well over time?
- 1.13 What are some tips and tricks for using Singer Heavy Duty sewing machines to create professional-quality garments and accessories?
- 2 Winding Up the Bobbin
- 3 Threading the Machine
- 4 Source
Key Takeaways
- Learn how to thread and function your Singer Heavy-Duty sewing machine
- Cover the basics from winding up the bobbin to threading the machine and using the basic functions
- Great for beginners or anyone needing a refresher

Basic Functions
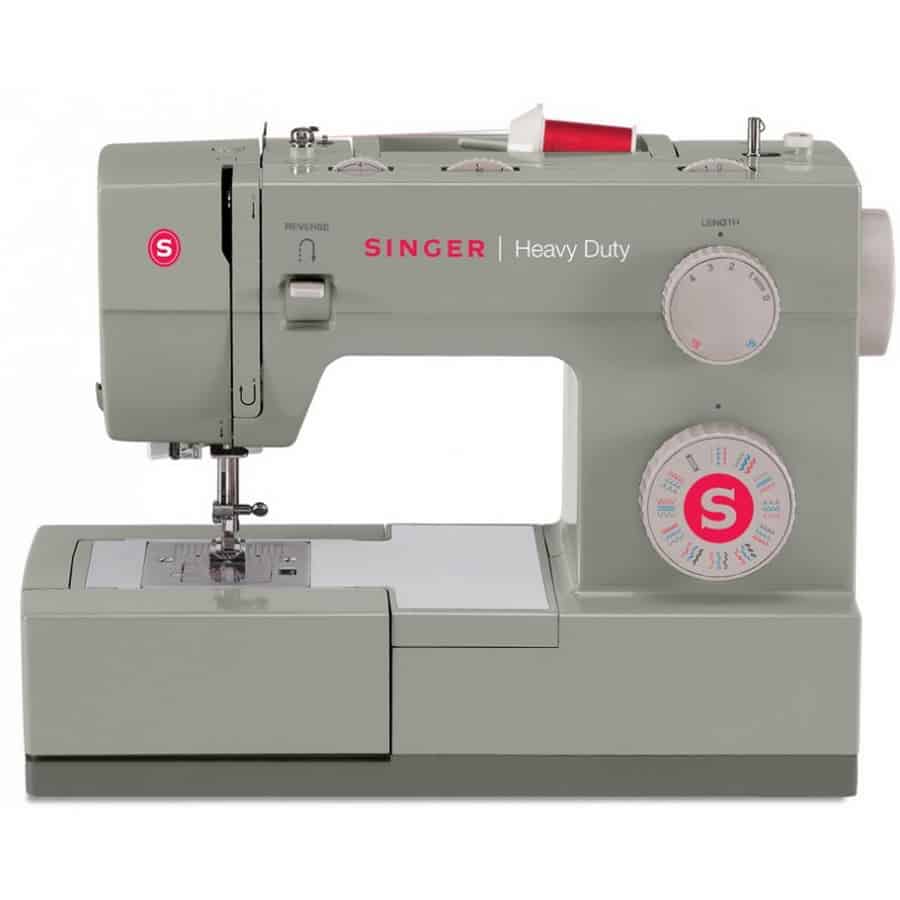
On and Off Button
To turn on the Singer Heavy-Duty Sewing Machine, locate the on/off button and switch it to the on position. The light will turn on, indicating that the machine is ready to use. If the light doesn’t turn on, check to make sure that the plug is connected to the outlet and the machine is properly plugged in.
Needle Control
The needle control is used to control the needle’s movement. Turn the wheel to control the needle manually, or use the pedal to control it automatically.
Bobbin Placement
To place the bobbin, locate the bobbin holder and insert the bobbin. Make sure the thread is properly wound and the bobbin is clicked to the right.
Thread Placement
To thread the machine, follow the guide and insert the thread through the designated areas. Make sure the thread is properly looped and tensioned.
Tension Button
The tension button is used to adjust the tightness of the stitches. The higher the number, the tighter the stitches will be. Adjust the tension according to the fabric you’re using.
Needle Position
The needle position can be adjusted to be all the way to the left, in the middle, or all the way to the right. Adjust the needle position depending on the type of stitch you want to create.
Stitch Options
The Singer Heavy-Duty Sewing Machine comes with different stitch options. Choose the stitch option you want to use and adjust the length and width accordingly.
Reverse Button
The reverse button is used to back tack when sewing. Press the button to sew backwards and reinforce the stitches.
That’s it for the basic functions of the Singer Heavy-Duty Sewing Machine. With these functions, you can start creating your own projects and designs. Remember to always refer to the manual for more detailed instructions and troubleshooting tips. Happy sewing!
What are the key features of Singer Heavy Duty sewing machines, and how do they differ from other Singer models?
They have a powerful motor, high sewing speed, and can handle thicker fabrics with ease. They also come with a variety of built-in stitches and needle positions, as well as an automatic needle threader and drop-in bobbin system.
How do you troubleshoot common issues with Singer Heavy Duty sewing machines, such as thread tension problems or jammed needles?
What types of fabrics and projects are best suited for Singer Heavy Duty sewing machines, and how do you choose the right needle and thread for each project?
How do you maintain and clean Singer Heavy Duty sewing machines to ensure they continue to perform well over time?
What are some tips and tricks for using Singer Heavy Duty sewing machines to create professional-quality garments and accessories?
Winding Up the Bobbin
To wind up the bobbin, start by taking the little bobbin and placing it on the machine. Make sure it is pushed in all the way down.
Then, take your thread and slip it through the small hole at the top of the bobbin. Next, take the thread and loop it around the metal part located on the top of the machine.
Once you have done that, bring the thread down to the bobbin and start twisting it in. Twist it around ten times or so, and then cut off any excess thread. The most important thing to remember when winding up the bobbin is to make sure that the bobbin winder is clicked to the right.
When you press the pedal, the machine will start winding up the bobbin. It will slow down and struggle a bit when it’s done. Once it’s done, cut the thread and take everything out so you can start fresh.
To insert the bobbin, open the clear cover and push the black square to the right. This will open the bobbin case. Place the bobbin inside the case, making sure that the tail is to the right.
Then, pull the thread under the silver plate in the middle and place it under the little hook.
Turn the wheel on the side of the machine towards yourself, and the needle will go down and pick up the bobbin thread. Pull on the needle thread to bring out the bobbin thread, and you’re good to go. Put the case back on, and you’re ready to start sewing.
Threading the Machine
To begin threading the Singer Heavy-Duty Sewing Machine, start by inserting the thread through the first guide located on the top of the machine. Then, take the thread down and through the second guide, making sure to bring it around the tension dial.
The tension dial controls how tight the thread will be when it comes out of the needle. I like to keep mine at around three, but you may need to adjust it depending on the fabric you are using.
After threading the tension dial, bring the thread down and through the third guide, which is located on the front of the machine. From there, loop the thread around the take-up lever, which is a small metal hook located on the left side of the machine.
Once the thread is looped around the take-up lever, bring it down and through the fourth guide, which is located just above the needle.
Next, thread the needle by taking the end of the thread and putting it through the eye of the needle. You can use a needle threader if you have trouble threading the needle by hand.
Once the thread is through the needle, pull it through until there is a tail of about six inches hanging from the needle.
Finally, wind the bobbin by placing a spool of thread on the spool pin and then taking the end of the thread and looping it around the bobbin winder tension disc. From there, insert the end of the thread into the hole on the bobbin and push the bobbin onto the bobbin winder spindle.
Press down on the foot pedal to wind the bobbin. Once the bobbin is full, cut the thread and remove the bobbin from the spindle.
With the bobbin wound and the machine threaded, you are now ready to start sewing. Remember to adjust the stitch length and width as needed for your project, and to always test your stitches on a scrap piece of fabric before sewing your final project.
Source
Watch the video here


Thanks for compiling this.
I would love to have one of these!
Great!
I think I would like to have a Singer.
i need this!
I remember my Mom making or fixing our clothes on her Singer.
Nice. Thanks
I can’t say enough good things about this machine. It out performs many others I’ve owned in the past.
Wonderful TY!
I learned a lot on this post. Excellent tips!
love this machine
Awesome. Thanks
i need one of this for making Kilts
Thanks for the instructions!
Nice machine
I would highly recommend this machine.
Singer has made great machines over the years
Awesome!
The classic, household name of sewing machines!
Thanks
thanks for the info – much needed
Thanks for the tutorial!
I am beginner, so I definitely benefit from this.
Great info about a great machine.
Valuable information. Thanks!
Thank you
Thanks for the information
This is a very tough and sturdy machine. I have owned one now for the past several years.
I haven’t owned a sewing machine before but want to get one. My goals are to make my own bedding, curtains and some clothing for my family. Thanks for this tutorial.
Singer definitely makes some of the best machines.
thanks for the great tips
I need one of these
Thanks for all the info
Great machine
An amazing machine. Is there a place to see a video with the BASICS of how to use a Sewing Machine for an older beginner?
I am not very good at sewing
The heavy duty machines are intimidating, this tutorial helps!
Mine was passed from my mom and desperately needs to be upgraded. This will come in handy when I do upgrade. Hopefully they’re not too different and I won’t need to completely relearn everything.
Placing this on my wish list!
Love this! Thank you 🙂
Now THAT’S a nice one
I know everything there is to know about this machine. I have been using one now for the past several years. I have a small sewing business and use it on a regular basis!
Thanks so much for sharing your experience with the Singer Heavy Duty Sewing Machine. I agree it’s a workhorse!
My mother just bought a Singer. She loves it.
looks like a powerful machine!
Very nice machine.
That top of the line heavy duty machine needs to be mine!!
That top of the line heavy duty machine needs to be mine!
these are great reviews
Pretty amazing stuff.
nice machine
Great machine
i am wondering if the machine is heavy enough. a lot of the new ones slide all over the place
i think i need one of these to handle my big projects
I find something new each time I read it.
so much I didn’t know.
Thanks for all the info. Love my heavy duty machine.
Excellent tips! You should publish a book (if you haven’t done so yet).
Thanks for all the info. Love my heavy duty machine.
thanks for the info