
Master The Art Cricut Cutting Machine

Want to know how to use your Cricut cutting machine? I found this great video for you that gives you all the secrets to get started making great projects for any beginner.
Table of Contents
- 1 WHY I RECOMMEND THIS VIDEO
- 2 Cricut Machines Quick Start Instructions
- 3 Setting Up the Cricut Cutting Machines- Detailed
- 4 Installing Design Space Software For Cricut Cutting Machines
- 5 Creating a Free Account
- 6 Essential Tools for Cricut Machines
- 7 Understanding Cricut Cutting Mats
- 8 Uploading PNG Files
- 9 Uploading SVG Files
- 10 Designing on Canvas
- 11 Cutting the Design
- 12 Finalizing the Project
- 13 Summary Cricut Cutting Machines
WHY I RECOMMEND THIS VIDEO
- Discover the endless possibilities of creating personalized gifts and decorations with the Cricut cutting machine!
- Unleash your creativity and bring your DIY projects to life with precise and intricate cuts that will leave everyone amazed.
- Experience the joy of crafting like never before as you effortlessly cut through a wide range of materials, from paper to fabric to vinyl.
- Say goodbye to tedious hand-cutting and hello to a world of efficiency and precision—let the Cricut cutting machine do the work for you!
- Get ready to take your crafting game to the next level with this revolutionary tool that will make every project a breeze.
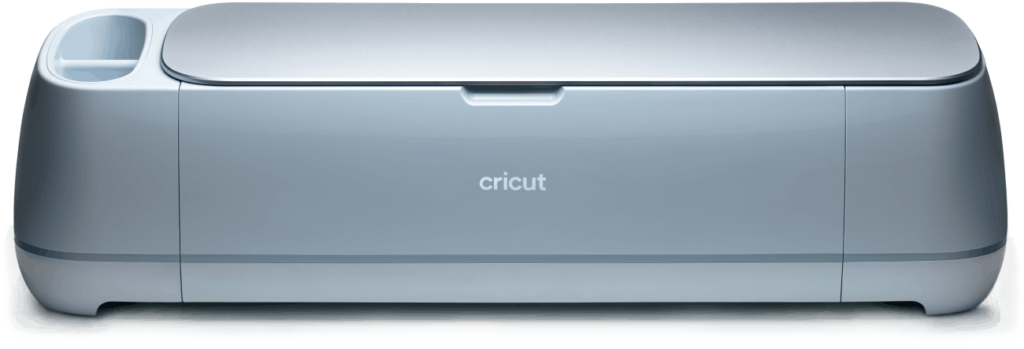
We have both the Cricut Maker and the Cricut Explore Air – both of which cut exactly the same. The only difference is that the Maker can cut fabric and the Explore Air has a different material knob on the front.
We will be going through the step-by-step process of how to use these machines, from setting them up to designing on canvas and preparing for cutting.
Key Takeaways
- Learn how to set up and use the Cricut machines, including the Maker and Explore Air.
- Understand the essential tools needed for Cricut machines, including cutting mats, squeegees, and weeding tools.
- Get familiar with the Design Space software, including uploading PNG and SVG files, resizing images, and preparing for cutting.
A Cricut cutting machine is a device that uses blades to cut various materials, such as paper, vinyl, fabric, and leather, into specific shapes and designs.
Cricut offers a range of cutting machines, including the Cricut Joy, Cricut Explore Air 2, and Cricut Maker. Each machine has different features and capabilities to suit different crafting needs.
Cricut cutting machines can cut a variety of materials, including paper, cardstock, vinyl, iron-on, fabric, leather, and even thin wood.
To use a Cricut cutting machine, you need to create or select a design using Cricut’s Design Space software, load your material onto a cutting mat, and then insert the mat into the machine. The machine will then cut the design according to your specifications.
Yes, you can use your own designs with a Cricut cutting machine. You can upload your own images or SVG files to Cricut’s Design Space software, or you can create your own designs using other software and then import them into Design Space.
Cricut Machines Quick Start Instructions
If you’re new to using Cricut machines, don’t worry! This article will provide you with a complete walkthrough on how to use the Cricut Maker and Cricut Explore Air.
To get started, attach the power cord and USB cord to the back of both machines. Then, connect the machine to your computer or laptop using the USB cord.
If you’re using a Mac, you may need an adapter for this. The Cricut Maker also has Bluetooth connectivity, so you can connect it to an iPad through Bluetooth.
Next, download and install Design Space, the software you’ll need for these Cricut cutting machines. You can find it on the Cricut Design Space website and select the system you’re using – Mac or PC.
Once you have it installed, you can set up your machine from the menu and select which machine you want to set up.
After setting up your machine, you can start designing. You’ll need some tools to work with your Cricut machines, such as a squeegee, weeding tool, reverse tweezers, small scissors, and an exacto knife.
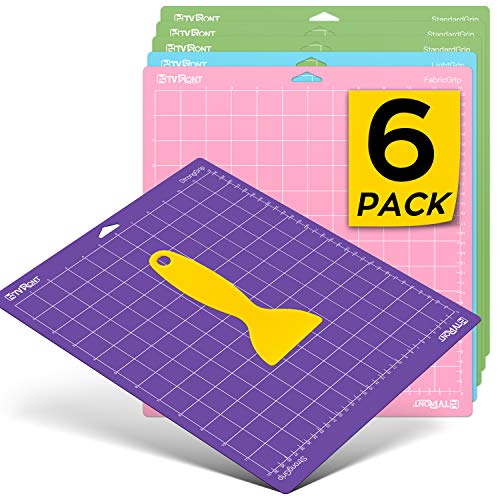
You’ll also need cutting mats, which come in several different sizes and grips.
When designing, you can upload a PNG or SVG file and choose from simple to complex. You can also select and erase areas of the image you don’t want to keep or just use the eraser to erase parts.
Then, you can save your design as a printing cut or as a cut image.
When you’re ready to cut out your design, make sure you place your vinyl exactly where it is shown on the screen. Then, select your material type from the drop-down menu and adjust the knob on the front of the machine if you’re using the Cricut Explore Air.
Finally, load your mat and hit the load button to start cutting.
That’s it! With these basic steps and tools, you can start creating your own designs with Cricut machines. Happy crafting!
Setting Up the Cricut Cutting Machines- Detailed
Once the machines are connected, you’ll need to install the Cricut Design Space software, which is necessary for using these cutting machines. You can download the software from the Cricut website and select the system you’re using (Mac or PC).
After installation, you can set up your machine from the menu and select which machine you want to set up. Make sure your machine is connected and turned on when you start the setup.
If you have a machine, you’ll get 30 days of free access to Cricut’s projects and fonts. After that, it’s a monthly subscription, but it’s not required to use the machine.
You can select the machine you’ll be using in the Maker or Explore Air series, and you’ll be ready to start designing.


You’ll also need cutting mats, which come in several different sizes and grips. The standard grip mat is what’s mostly used for vinyl, while the strong grip mat is for glitter pieces of vinyl and things that don’t adhere as well.
When uploading an image, you can choose from simple to complex and select and erase areas of the image you don’t want to keep. Once you have your image on your canvas, you can resize it, change the color, and save your design as a printing cut or cut image.

Finally, when cutting out your image, make sure you place your vinyl exactly where it’s shown on the screen and select your material from the drop-down menu. Once you’re ready to start cutting, load your mat by getting the corners underneath the guides on your Cricut machine and holding some pressure while hitting the load button.
When removing your decal, pull the mat away from the vinyl to ensure it comes out flat.
Installing Design Space Software For Cricut Cutting Machines
To start using your Cricut cutting machine, you will need to install the Design Space software. It is the software you will need for these cutting machines.
To install it, go to the Cricut Design Space website and select the system you are using either Mac or PC. Then, download and install it on your computer.
Once you have installed the software, you can set up your machine from the menu and select which machine you want to set up. You’ll want to make sure your machine is connected and turned on when you start the setup.
You can also set up a free account at this point. If you have a machine, you get 30 days of free access to Cricut’s projects and fonts. After that, it is a monthly subscription, but it is not necessary to purchase it if you don’t want to.
Next, select the machine that you’ll be using in the Maker or the Explore Air series, and you’ll be ready to start designing. If you have the Cricut Maker, you can connect to an iPad through Bluetooth, as the Maker has Bluetooth connectivity. However, if you’re using a Mac, you may need an adapter.
Overall, installing the Design Space software is an easy process that will allow you to start using your Cricut machine right away. With the software and your machine set up, you can start designing and creating to your heart’s content.
Creating a Free Account
To get the most out of your Cricut cutting machine, it’s recommended that you create a free account with Cricut Design Space. With a free account, you’ll have access to a wide range of projects and fonts that you can use with your machine.
To create a free account, simply go to the Cricut Design Space website and select the option to sign up. You’ll be asked to provide your name, email address, and a password.
Once you’ve filled out the required information, you’ll receive an email with a link to verify your account.
After you’ve verified your account, you’ll be able to access Cricut Design Space and start exploring all of the projects and fonts that are available. You’ll also be able to save your own designs and access them from any device with internet access.
If you have a Cricut machine, you’ll automatically receive 30 days of free access to Cricut projects and fonts. After your free trial period is over, you’ll have the option to continue your subscription for a monthly fee.
However, if you don’t want to continue your subscription, you can still use your machine and create your own designs without access to the Cricut projects and fonts.
Creating a free account is a great way to get started with your Cricut machine and explore all of the possibilities that it has to offer. So why not sign up today and start creating?
Essential Tools for Cricut Machines
When it comes to using Cricut machines, having the right tools can make all the difference. Here are some essential tools that you’ll want to have on hand:
Squeegee
A squeegee is necessary when applying decals to surfaces and also helps to remove some materials from the mat. It comes in a small size and also a larger size.
Weeding Tool
The weeding tool is used to pick up vinyl and weed out bottle. It has a little pic on the end that makes it easy to use.
Reverse Tweezers
Reverse tweezers are helpful when you have tiny bits of vinyl such as dots and you need to place them where they go. They are so handy!
Small Scissors
Small scissors are used for cutting and are an essential tool to have on hand.
Spatula
This little spatula is handy for removing stickers or die-cuts from the mat and keeping them flat.
Exacto
The Exacto is used to cut around areas that are stuck if your machine blade is getting dull.
Cutting Mats
Cutting mats come in several different sizes and grips. The grip you choose will depend on the material you are cutting. It’s best to have a variety of sizes and grips on hand.
Having these essential tools on hand will make using your Cricut machine easier and more enjoyable.
Understanding Cricut Cutting Mats
When using a Cricut cutting machine, it is important to understand the different types of cutting mats available and which one to use for each project. Cutting mats are essential for holding your material in place while it is being cut by the machine.
There are several different types of cutting mats available, including the StandardGrip mat, the LightGrip mat, the StrongGrip mat, and the FabricGrip mat. The StandardGrip mat is the most commonly used mat and is suitable for use with a wide range of materials, including cardstock, vinyl, and iron-on.
The LightGrip mat is designed for use with delicate materials such as vellum, thin paper, and washi tape. The StrongGrip mat is ideal for use with heavyweight materials such as leather, chipboard, and magnet sheets.
The FabricGrip mat is designed for use with fabric and features a special adhesive that is gentle on fabrics while still holding them in place during cutting.
When selecting a cutting mat, it is important to consider the size of your project and the size of your material. Cricut cutting mats come in several different sizes, including 12×12 inches, 12×24 inches, and 6×12 inches. It is also important to consider the adhesive strength of the mat, as a mat that is too sticky can damage delicate materials.
To use a cutting mat, simply place your material onto the mat and press it down firmly to ensure it is securely attached. Then, load the mat into the Cricut cutting machine and follow the prompts on the software to begin cutting.
By understanding the different types of cutting mats available and which one to use for each project, you can ensure that your Cricut cutting machine produces accurate and high-quality cuts every time.
Uploading PNG Files
If you have a PNG file that you want to upload to Design Space, it’s easy to do. First, click on “New Project” to start a new canvas. Then, click on “Upload” on the left-hand side of the screen.
You’ll see two options: “Upload Image” and “Upload Pattern.” Click on “Upload Image,” and then select the PNG file you want to upload from your computer. Once you’ve selected the file, click on “Open.”
Next, you’ll see a preview of your image. You can crop it by dragging the corners of the box that appears around the image. If you want to remove any parts of the image, you can use the “Eraser” tool to do so.
Once you’re happy with your image, click on “Continue.” You’ll be asked to choose whether you want to save your image as a “Print then Cut” or “Cut Image” file. If you’re going to be cutting your image out of vinyl or another material, choose “Cut Image.”
Finally, give your image a name and click on “Save.” Your image will now be available in your “Uploaded Images” folder, and you can use it in any project you like.
Uploading PNG files is a great way to add custom images to your projects. Whether you’re making decals, t-shirts, or anything else, Design Space makes it easy to turn your ideas into reality. So go ahead and give it a try – you’ll be amazed at what you can create!
Uploading SVG Files
If you have an SVG file that you want to use for your project, uploading it to Cricut Design Space is very easy. First, click on “Upload” on the left-hand side of the screen. Then click on “Upload Image” and select your SVG file from your computer or device.
Once your file is uploaded, you will see a preview of it on the screen. You can adjust the size of the image and choose whether you want it to be a print and cut image or a cut image.
If your SVG file has multiple layers, you can separate them by clicking on “Ungroup” at the bottom of the screen. This will allow you to work with each layer separately and customize your design even further.
Once you have your design ready, you can save it to your account and use it for your project. Uploading SVG files to Cricut Design Space is a great way to add unique designs to your projects and make them truly your own.
Remember, if you’re having trouble with your SVG file, make sure it’s saved as a vector image and not a raster image. Vector images can be resized without losing quality, while raster images can’t. With a little practice, you’ll be uploading SVG files like a pro in no time!
Designing on Canvas
Designing on canvas is easy with the Cricut cutting machines. Once you have installed the Cricut Design Space software and set up your machine, you can start designing your project on canvas.
To begin, upload your image to the canvas by clicking on the “Upload” button on the left-hand side of the screen. You can upload an image in PNG or SVG format.
If you have a PNG file, you can choose between a simple or complex image. If you have an SVG file, simply name your file and save it.
Once your image is on the canvas, you can resize it to your desired size by clicking and dragging the corners of the image. Make sure to keep the lock box checked to maintain the image’s proportions.
You can also change the color of your image by selecting the color box at the top left of your screen.
When you are ready to cut out your image, click on the “Attach” button at the bottom right-hand side of your screen. This will ensure that your image is cut out exactly as it appears on the canvas. You can then select the mat size you want to use and choose your material type from the drop-down menu.
Once you have loaded your mat into the machine, press the “Load” button and follow the prompts on the screen to start cutting. When removing your vinyl from the mat, be sure to pull the mat away from the vinyl to ensure a flat decal.
Designing on canvas with the Cricut cutting machines is a fun and easy way to create custom projects. With a variety of tools and materials available, the possibilities are endless.
Cutting the Design
Now that you have your design ready, it’s time to cut it out. First, make sure you have the correct cutting mat for your material. The Cricut machines come with different mat sizes and grips, so choose the one that best suits your project.
Next, load your mat into the machine by positioning the corners under the guides and holding it in place while pressing the load button. If the mat doesn’t load correctly, simply hit the load button again to unload it and try again.
Once your mat is loaded, select your material type from the drop-down menu on your screen. If you’re using a Cricut Maker, you can choose from a wide variety of materials, including fabric, paper, and vinyl. If you’re using an Explore Air 2, you can adjust the material knob on the front of the machine or select “custom” and choose your material from the drop-down menu.
Before you start cutting, make sure your design is positioned correctly on the mat. You can use the arrows on your screen to move the design around or click on the three dots to move it to another mat. If you’re using heat transfer vinyl, be sure to mirror your image before cutting.
Once everything is set up, press the “continue” button to start cutting. The machine will automatically adjust the blade depth and pressure based on your material type, so you don’t have to worry about any complicated settings.
When the machine is finished cutting, unload your mat and carefully peel away the excess material from your design. Use a weeding tool to remove any small pieces of vinyl or paper that are still attached.
And that’s it! With a little practice, cutting designs with your Cricut machine will become second nature. So go ahead and experiment with different materials and designs to create unique and personalized projects.
Finalizing the Project
Now that you have successfully designed and cut your vinyl decal, it’s time to finalize the project. First, remove the excess vinyl from the mat using the weeding tool. Be sure to take your time and carefully remove any small pieces of vinyl.
Next, use the transfer tape to transfer your vinyl decal to the desired surface. Cut a piece of transfer tape slightly larger than your vinyl decal and place it over the decal.
Use the squeegee to smooth out any air bubbles and ensure the vinyl is firmly attached to the transfer tape.
Once your vinyl decal is attached to the transfer tape, carefully place it onto the surface you want to apply it. Use the squeegee to smooth out any air bubbles and ensure the vinyl is firmly attached to the surface.
Finally, slowly and carefully remove the transfer tape from the vinyl decal. Start at one corner and slowly peel the transfer tape back at a 45-degree angle.
If the vinyl starts to lift with the transfer tape, use the squeegee to press it back down and try again.
Congratulations, you have successfully designed, cut, and applied your vinyl decal using your Cricut machine! With a little practice, you’ll be able to create all sorts of personalized and unique projects. Don’t be afraid to experiment with different materials, colors, and designs. Have fun and happy crafting!
Summary Cricut Cutting Machines
Congratulations! You have completed the complete walkthrough on how to use a Cricut cutting machine. Now that you have learned the basics, you can start designing and creating your own projects.
Remember to use the necessary tools such as the squeegee, weeding tool, and cutting mats, and select the appropriate material type for your project.
It’s important to note that while Cricut Access is a monthly subscription service, it’s not necessary to purchase it if you don’t want to. You can still create amazing projects with the free design space software and your Cricut machine.
Don’t forget to mirror your image when using heat transfer vinyl and to pull the mat away from the vinyl when removing your decal to ensure a flat finish.


OMG, this sounds like such a wonderful tool that can be used for so many things. I want one.
I have a Silhouette machine and it gets a workout during the holidays for sure. Both are great cutters for precision work.