Converting Your Artwork into Embroidery with a Sewing Machine

Have you ever wondered how you could transform your artwork into beautiful embroidery using a sewing machine? Well, I have some exciting news for you! It’s totally possible!
With the right techniques and tools, you can easily convert your drawings or designs into stunning embroidered pieces. In this blog post, I’ll guide you through the process and share some helpful tips and tricks to make the process enjoyable and successful. So, let’s get started on this creative journey together!
Table of Contents
Key Takeaways:
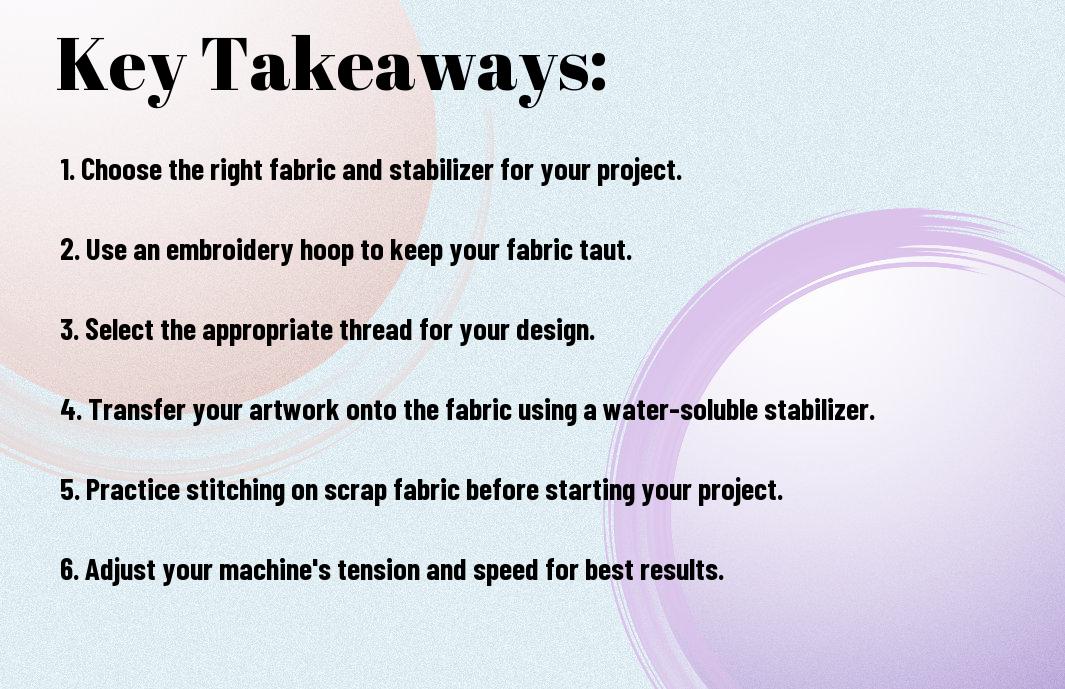
- Proper Preparation: Before starting the embroidery process, ensure that your artwork is properly prepared. This includes selecting the right fabric and stabilizer, transferring the design onto the fabric, and securing the fabric in the embroidery hoop.
- Understanding Your Sewing Machine: It’s important to familiarize yourself with your sewing machine’s embroidery features, such as adjusting the tension, choosing the right needle, and selecting the appropriate stitch settings for your design.
- Patient Practice: Perfecting the art of converting your artwork into embroidery takes time and practice. Be patient with yourself as you learn to manipulate the sewing machine to achieve the desired results.
Preparing Your Design
Clearly, the first step in converting your artwork into embroidery is to prepare your design for the sewing machine. If you’re new to this process, I highly recommend checking out this detailed guide on Turning Art Files Into Embroidery With Digitizing for more in-depth information.
Choosing Your Artwork for Embroidery
When choosing artwork for embroidery, consider the size and level of detail in your design. I suggest selecting a design with clear, defined lines and limited intricate details for easier conversion to embroidery. Also, keep in mind that smaller artwork may lose some detail in the embroidery process, so choose your design accordingly.
Simplifying the Design for Sewing
To ensure successful embroidery, simplifying the design is crucial. Remove any unnecessary elements and reduce the number of colors to make the conversion process smoother. Remember that complex designs with multiple colors and small details may not translate well to embroidery, so keep it simple and bold for best results.
Getting to Know Your Sewing Machine
After deciding to convert your artwork into embroidery using a sewing machine, the first step is getting to know your machine. This is crucial, as understanding the features and functions of your sewing machine will greatly affect the quality of your embroidery work. Whether you have a basic or computerized sewing machine, familiarizing yourself with its parts and capabilities is essential.
Essential Features for Machine Embroidery
When it comes to machine embroidery, there are a few essential features that you should look for in your sewing machine. First, make sure that your machine has a free arm, which will allow you to maneuver your fabric easily.
Additionally, having a variety of built-in stitches, including zigzag and decorative stitches, can add depth and dimension to your embroidery. Lastly, a machine with adjustable speed control and automatic needle threading can make the embroidery process smoother and more efficient.
Setting Up Your Sewing Machine
Before you start embroidering, it’s important to properly set up your sewing machine. Begin by ensuring that the machine is clean and well-maintained to prevent any disruptions during the embroidery process.
I recommend using a new embroidery needle and high-quality embroidery thread to achieve the best results. Additionally, don’t forget to test the tension and stitch settings on a scrap piece of fabric before beginning your project. This will help you fine-tune the settings and avoid any potential issues while embroidering.
The Embroidery Process
To start the embroidery process, you’ll need to gather all of your materials. This includes your sewing machine, embroidery hoop, fabric, stabilizer, and your chosen design. Once you have everything ready, you can begin the exciting process of turning your artwork into beautiful embroidery!
Transferring Your Design onto Fabric
The first step in the embroidery process is transferring your design onto the fabric. There are a few different methods for doing this, including using transfer pens or pencils, iron-on transfers, or tracing the design onto the fabric. Whichever method you choose, make sure to secure the fabric in your embroidery hoop to keep it taut and flat while you work.
Techniques and Tips for Smooth Stitching
When it comes to actually stitching your design, there are a few techniques and tips that can help ensure a smooth and professional-looking result.
First, make sure to use the right type and size of needle for your fabric and design. Additionally, adjusting the tension and speed of your sewing machine can make a big difference in the quality of your stitching.
Remember to practice on scrap fabric to get a feel for the stitch length and tension before starting on your actual project. The use of stabilizer is also important for supporting the fabric and preventing any puckering or distortion.
Finally, always backstitch at the beginning and end of each section to secure the threads. The key to smooth stitching is taking your time and paying attention to the details.
- Choose the right needle and adjust the tension
- Practice on scrap fabric before starting on your project
- Use stabilizer to support the fabric
- Backstitch at the beginning and end of each section
The quality of your stitching will greatly impact the overall look of your embroidery, so taking the time to master these techniques is well worth it. Remember, the more careful and deliberate you are with your stitching, the better the final result will be.
Troubleshooting Common Issues
Embroidering with a sewing machine can be a fun and creative way to turn your artwork into beautiful, textured designs. However, like any craft, there are potential challenges that may arise. Here are some common issues you may encounter and how to address them.
Thread Tension Troubles
One common issue you may come across when converting your artwork into embroidery is thread tension troubles. If you notice loose or tight stitches, it may be a sign that your thread tension needs adjustment.
I recommend starting by checking your machine’s manual for instructions on how to adjust the thread tension. You can also experiment with different thread weights and types to see what works best for your project. Additionally, ensuring that your machine is properly threaded and your bobbin is inserted correctly can also impact thread tension.
Fabric Puckering and How to Avoid It
Another issue that can occur when embroidering with a sewing machine is fabric puckering. This can happen when the fabric is not properly stabilized, causing it to pucker and distort the embroidered design.
To avoid this, I recommend using a stabilizer or hoop to hold the fabric taut while embroidering. You can also try using a lighter weight stabilizer for delicate fabrics or adjusting the tension on your hoop to minimize puckering.
Taking the time to properly prepare your fabric before embroidering can help prevent puckering and ensure a smooth finish to your artwork.
Beyond the Basics
Despite perfecting the basic techniques, there are so many ways to take your machine embroidery to the next level. Whether you want to experiment with different stitches and threads or find creative ways to display your finished pieces, there are plenty of options to explore.
Experimenting with Different Stitches and Threads
When you feel confident with the basic stitches, why not experiment with more advanced options? Different stitches can add texture and depth to your artwork, creating a more dynamic finished piece.
Additionally, playing with different threads, such as metallic or variegated threads, can add a unique and eye-catching element to your embroidery. You can also try mixing different thread weights for even more variety in your designs.
Don’t be afraid to get creative and see what new effects you can achieve with your sewing machine.
Completing and Displaying Your Embroidered Art
Once you have completed your embroidery, the fun part is finding creative ways to display and showcase your artwork. Whether you choose to frame it, turn it into a pillow, or incorporate it into a quilt, there are countless options for displaying your embroidered pieces.
I love to take my finished embroidery and turn them into patches that I can sew onto bags or jackets. This not only allows me to show off my work, but also adds a personal touch to my wardrobe.
Whether you choose to keep your finished pieces for yourself or give them as gifts, completing and displaying your embroidery allows you to share your creativity with others.
Converting Your Artwork into Embroidery with a Sewing Machine
With this in mind, I hope you feel more confident and motivated to start converting your artwork into embroidery with a sewing machine. It’s a fun and rewarding process that allows you to bring your creative designs to life in a unique and tactile way.
With a little practice and patience, you’ll soon be able to create custom-embroidered pieces that showcase your personal style and creativity. So, grab your sewing machine and let’s get stitching!
FAQ
Q: Can I use any type of artwork for embroidery with a sewing machine?
A: While technically you can use any type of artwork, it’s best to use high-quality, clear designs to ensure the best results. Simplified and solid designs tend to work best for embroidery.
Q: Do I need special software for converting my artwork into embroidery designs?
A: Yes, you will need embroidery software to digitize your artwork and convert it into a format that can be read by the sewing machine. There are various software options available, and some machines also come with built-in design functions.
Q: Can I convert my own hand-drawn artwork into embroidery designs with a sewing machine?
A: Absolutely! Many artists enjoy the process of digitizing their own hand-drawn artwork and seeing it come to life through embroidery. You can scan or photograph your artwork and then use the embroidery software to trace and digitize it for stitching.