What is an Embroidery Stabilizer?

Embroidery Stabilizers Explained
An embroidery stabilizer, also referred to as embroidery backing, is exactly what it sounds like: it’s placed on the back of the fabric you’re working with and helps to stabilize the material. The stabilizer prevents the material from moving about, stretching, puckering, or making any other motions while it is being embroidered; all things that can detract from the quality of the craftsmanship. A stabilizer also helps to maintain the quality of the embroidery after it has been completed. In other words, a stabilizer improves embroidery, from start to finish.
Types of Embroidery Stabilizers
There are three main types of embroidery stabilizers, which include:
- Cut away. This type is usually used with an embroidery machine, though it can also be use with hand embroidery. It’s attached to the opposite side of the fabric prior to stitching, and it remains underneath the stitching; however, any excess is cut away when the embroidery is finished.
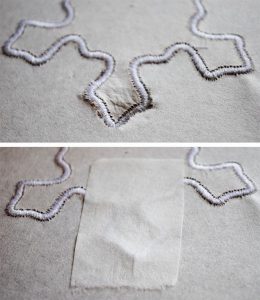
- Tear away. This type of stabilizer is similar to a cut away stabilizer; however, it is usually applied to the front side of the material that is being embroidered, and it is removed once the stitching is completed.
- Wash away. This is a water soluble stabilizer that dissolves in water; therefore, when the fabric is soaked or washed, the stabilizer dissolves.
When Should You Use an Embroidery Stabilizer?
As mentioned, you could embroider without a stabilizer; however, if you want to ensure the best results, using one is highly recommended, particularly with the following fabrics:
- Thin materials. Using a stabilizer can prevent the back of your stitching from being seen through a thin fabric, such as lightweight chiffon or chintz.
- Light-colored materials. A stabilizer can also conceal embroidery stitches in light-colored materials, such as white, beige, or light gray.
- Stretchy materials. If you are embroidering knits, like a T-shirt, or any other fabric that has a lot of stretch, then using a stabilizer is highly recommended, as it not only will enhance your stitching, but it will also help to maintain the look.
- Loose weaves. Fabrics that have spaces between the fibers, like linen, can be difficult to embroider, as there are minimal places to pull the thread through, which can make it difficult to create smooth stitches. A stabilizer adds more structure to the material, thereby making it easier to embroider.
For more sewing help, including tips and tricks for your sewing machine – and much more – be sure to check out the other informational guides here on Teach You to Sew.