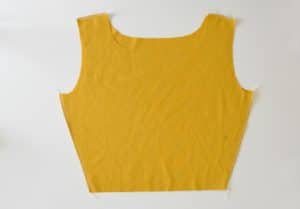
How to Sew Armholes to Fit Bodice

 You have the perfect sewing pattern for a jacket or shirt, or you’re planning on making a lovely gown with a dress form. You’ve picked out the perfect sewing fabric (whether it’s suede, linen, denim and chambray, lace, faux leather, or knit), and you have all of the sewing essentials you need to make your garment. You can’t wait to start up your sewing machine and wear your new piece! There’s just one problem: you don’t know how to sew the armholes so that they fit the bodice!
There’s nothing more uncomfortable than wearing a shirt, jacket, or dress with armholes that aren’t properly fitted to the bodice; and let’s be honest: it doesn’t matter how beautiful the garment is, if it doesn’t fit properly, you aren’t going to wear it (or maybe you will wear it, but you certainly won’t be comfortable). The key to getting the armhole to fit the bodice is to ensure that the hole is the proper size and shape for your body’s unique shape.
In this sewing help guide, we’ll teach you how to sew armholes so that they fit the bodice of a garment.
Steps
To sew the armholes to a bodice, you’ll need to complete the following steps:
- Pin the sleeves to the armholes so that the right sides are joined together and the sleeve is sitting in a curved position, opposite the curve of the armhole.
- Ensure that the notches of the sleeves match up on both sides.
- Pin the sleeve at the notches, as well as the beginning and end of the armhole. The sleeve should be perfectly matched up between the notch and the end of the armhole; it shouldn’t be off at all. If done correctly, you should have two large pockets of fabric situated between the three pins along the top, which will be the sleeve cap ease.
- Before you start sewing, cup the fabric so that you can retain the shape of the sleeve while you’re stitching; doing so will make it easier to affix the sleeve cap.
- Using your fingers, contract the material by pulling on the opposite ends of the seam and the material should sit pretty flat. Use this method to ease the fabric between the pins until the sleeve is completely set into the body.
- Close up the seam on the underarm of the sleeve. Once you have set the sleeve into the armhole, you will use one continuous seam, which will run from the hem of the sleeve to the hem of the waist.
Once you’ve sewn the seams of the sleeve, you can then clip and trim any unwanted material you’d like. You might want to press the seam, too, to smooth it out. Lastly, turn the shirt right side out and inspect your work. You should end up with a sleeve that properly fits the bodice of your garment.
It might seem like a daunting task, but with patience and practice, you’ll soon be able to master this important sewing technique.
image: https://www.sewalongs.com/moneta/moneta-sew-the-bodice-all-versions